A secret weapon underpins the success of many students: The art of creating practical study notes. From secondary schools to universities, students across the nation are searching for the best method to take notes. Whether you’re cramming for the Junior Cert, Leaving Cert or preparing for a university exam, this guide is designed to help you master the art of note-taking.
The Importance of Study Notes
Taking notes is a crucial part of the learning process. It helps you absorb and understand the material, and it also provides a valuable resource for revision. While everyone has their own unique style and method, there are a few key principles that can make your notes more effective.
What Is the Best Method to Take Notes?
There’s no one-size-fits-all when it comes to methods of note-taking, but here are a few strategies that have proven to be effective for many students:
The Cornell Method
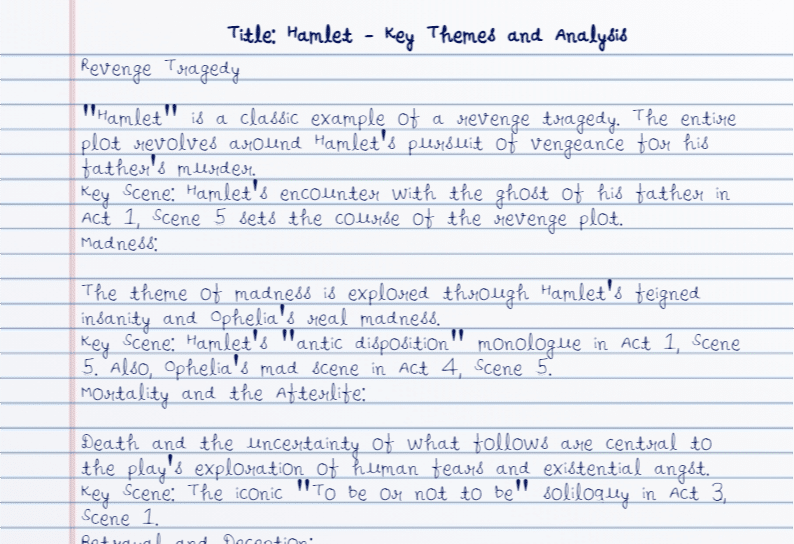
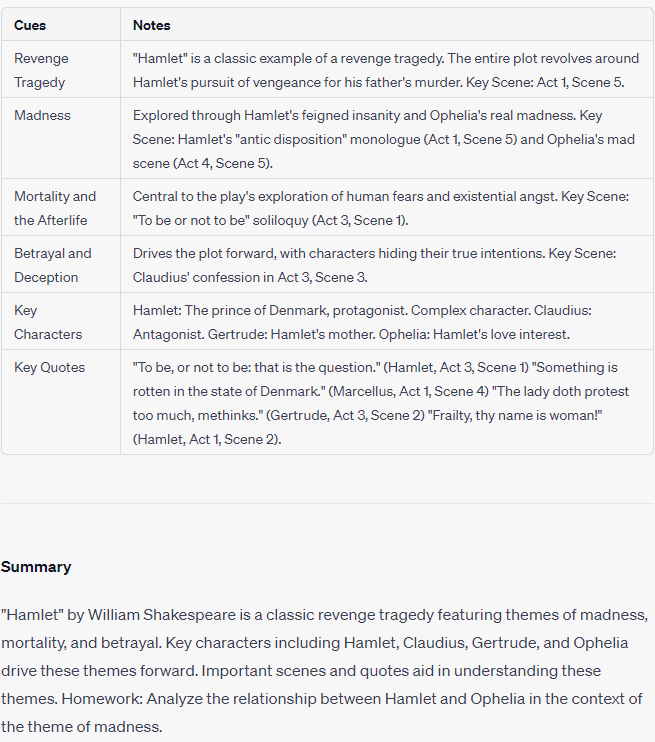
This involves dividing your paper into three sections: cues, notes, and summary. This system allows you to note main ideas, and details, and summarise your notes, promoting active learning. The Cornell Method is a systematic format for condensing and organising notes without the need for laborious recopying. Developed by Walter Pauk, an education professor at Cornell University, this method is particularly effective for distilling a large amount of information into a concise summary that’s easy to review. The Cornell Method involves dividing a page into three sections to organise your notes:
Cues Column (Left Side)
On the left side of your page, draw a vertical line to create a narrow column about 2 inches wide. This is your cues column. Here, you jot down the main ideas or questions about the topic. These cues can be written either during the lecture or immediately after while the material is still fresh in your mind.
Notes Column (Right Side)
The rest of the page to the right of the cues column is where you make your actual notes. These notes should include definitions, important points from the lecture or textbook, diagrams, and anything else that seems relevant. The goal is to capture the main points of the lecture or reading, not to transcribe everything word for word.
Summary (Bottom)
At the bottom of the page, you create a section for a brief summary. After the lecture or at the end of your study session, take a few minutes to summarise the key points from the page in your own words. This helps to consolidate your understanding of the topic and provides a quick review for later.
When reviewing your notes, cover the right-hand notes column while looking at the cues. This helps to test your knowledge and understanding of the topic.
The Cornell Method is popular because it encourages active engagement with the material, helping you to understand and retain the information more effectively. It’s also a flexible method that can be adapted to a variety of learning styles and types of information. Whether you’re reviewing lecture notes, reading a textbook, or preparing for an exam, the Cornell Method can help you make the most of your study time.
Mind Mapping
A visual method of note-taking, mind mapping involves writing a main idea in the centre of your paper and branching out related ideas and concepts. Mind mapping is a highly effective method of studying and taking notes that capitalises on the brain’s natural tendency to process information visually. This technique involves drawing a diagram that connects information around a central concept. It is particularly useful for visual learners and for subjects that involve complexly interrelated topics.
Here’s a step-by-step guide on how to use the mind-mapping method:
Outlining
A hierarchical method where main ideas are jotted down as headings and details or sub-points are written as subheadings. This method is excellent for organising notes from textbooks.
Here is an example of outlining method:


The Outlining Method allows for the hierarchical organisation of information, which can make it easier to understand and remember the relationships between different points.
How Do You Prepare Notes for Self Study?
When preparing notes for self-study, start by reviewing the material and identifying the main ideas or topics. Use the methods outlined above or consider how to make study notes online using digital note-taking platforms.
To make notes from a textbook, read each section or chapter carefully, highlight key points, and then summarise these points in your own words. This helps you understand the content better and makes it easier to recall later.
Learning to take lecture notes on a laptop can be a game-changer if you’re attending lectures. Utilise note-taking apps that can help you organise your notes efficiently. Remember, the key is to capture the main points, not to transcribe the entire lecture.
How to Take Notes for Beginners
If you’re new to note-taking, it might seem overwhelming. Here are a few tips:
Note-Taking in the Digital Age
Wondering how to make notes on a laptop? The digital world offers a range of tools to help you create, organise, and access your study notes. From OneNote to Google Docs, there are plenty of platforms that can be used for note-taking. You can type your notes, draw diagrams, create flashcards, and even share your notes with classmates.
How Careerhub Can Help
Careerhub is a valuable resource for Irish students. Not only does it provide advice on career and job opportunities, but it also offers a range of educational resources, including tips on how to make study notes for students. Take advantage of these resources to enhance your study skills and set yourself up for success.
Note-taking is a skill that can be honed with time and practice. Whether you’re jotting down points during a lecture, making notes from a textbook, or preparing self-study notes, remember that consistency is key. It’s not just about making notes, but making them work for you.
Note-taking is an essential skill, not just for academic success but also for your future career. So, start today and make your study notes your secret weapon to success!